Hi Scarlet Caps...the second half of hockey season is underway and this is promises to be an exciting spring in Washington!
As with anything in life, excitement and anticipation can be energizing, but these emotions can also throw us off our game, literally and figuratively, if we don't stay grounded.
Scarlet Blog - Yoga with Kelly
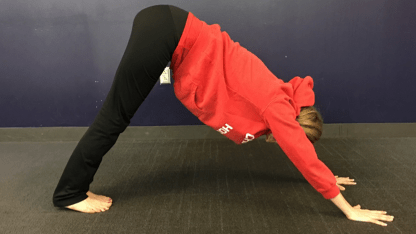
Let's Practice: Down Dog (Adho Mukha Svanasana)

By
Scarlet Caps @ScarletCaps
This is why in yoga we build our poses from the ground up. So before you worry about what to do with your arms or where to focus your gaze, concentrate on establishing a sturdy foundation. You will move with greater ease, more confidence and less anxiety. You will feel better. And because you will be operating from a position of strength, you won't wobble or fall down quite so easily (which is especially critical if you're on skates!).
Down dog is (now) one of my favorite yoga poses and a great way to practice getting grounded. You'll also get an incredible stretch along the back of your body...from your hands, up your arms, down your back and legs and all the way to your feet. Down dog will strengthen your shoulders, legs, arms and hands, especially your wrists, as well as relieve fatigue, headaches and insomnia. Once you get the hang of it, it's also very relaxing. I totally decompress in this pose.
(Full disclosure: You could say that is was not love at first sight for me and this pose. I wasn't very flexible and did not have a lot of strength in the supporting muscles in my back. And my approach was all wrong. Rather than allowing my body to open into the pose, I was trying to shove it into what I thought it was supposed to look like. The result was predictable: it felt lousy, and frustrating. If this sounds familiar, just take it slow, respect where you are today and let your body, and breath, be your guide.)
Start by getting on all fours with your knees under your hips and your hands shoulder-width apart. Since the finished pose is an inverted V, place your hands forward of your shoulders, not directly below them. How far forward is going to depend on your body, but a general rule of thumb is about two hand lengths. The creases of your wrists should be parallel to the front of the yoga mat. Although you can practice on a carpet or with socks on, be careful that you don't slip.
Many students make the mistake of having a weak foundation-their hands and fingers are soft, not planted firmly in the ground. The result is that all the weight of the upper body feels like it's driving into the heels of the hands (because it is). This will become uncomfortable fast and will stress your wrists so make sure that your entire hand is bearing weight.
Take a deep breath, curl your toes under and start to straighten your legs. Slowly. Move with your breath. Your tailbone will be the highest point of the pose. You do not have to straighten your legs all the way if that is a strain. Your heels probably will not touch the floor and that's fine.
Be mindful of your neck and head. I like to alternate between letting my head drop and looking up at my hands. Do what feels best.
The traditional instruction is to have your feet together. To be honest, for the first several years that I practiced, having my feet together felt lousy. It felt much better having them apart. So give yourself a break and move them apart if that seems like the thing to do.
Spend several breaths here without exerting yourself. Imagine that you're simply hanging out in an upside down V shape. Drop your head, breathe deeply and relax.
Now soften your knees until you no longer feel a stretch in your hamstrings. Imagine that you're pushing the front of the mat away from you and gently lengthen your arms. Nudge your tailbone higher if you comfortably can. You should feel a nice stretch under the arms and down your back. Take a few breaths here.
When you're ready for a break, lower your knees to the floor, sit back on your heels and rest your forehead on the floor in front of you--this is called child's pose. You could also make a pillow with your hands and rest your forehead on your hands. I recommend keeping your toes together and opening your knees wide.
Let's come up into down dog one more time. Try to do so as mindfully as you can. Extend one arm in front of you on an inhale and then the other one, also on an inhale. Look at your hands. Keep the creases of your wrists facing forward to protect your wrists. Spread your fingers wide but don't strain. Get grounded. Without moving your hands, come up onto your knees, curl your toes under, and slowly straighten your legs as much as you comfortably can.
Breathe. Be open to the possibility that there is another way to experience this pose that is more appropriate for you. Maybe you want to step your feet apart or move them closer or farther away from your hands. Maybe this pose will feel good with one or both knees bent, up on your toes or with one leg extended behind you. Try not to think about it too much. Let your body guide you.
Come down to the floor and take a few breaths when you are finished.
The moral of this pose is that the more attentive you are to your foundation, the more grounded you will be. In everything you do.
Let's go Caps!


